How to use the EA Plan (SrPlanClient)
The Plan robot draws Alpha's daily/weekly plan on your MT5 chart: support, resistance, liquidity zones and each trade idea, with a control panel to switch items on and off. Use it together with AlphaOnChart's free indicators and signals. The interface is in English.
- 01
What the EA does, and what it does not
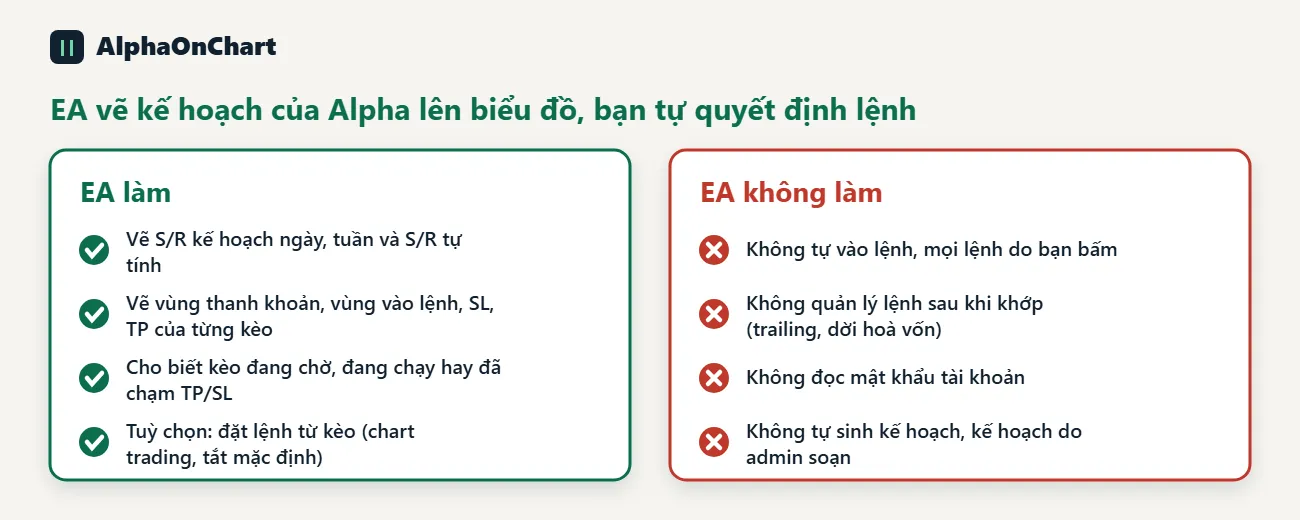
SrPlanClient is the member edition of the Plan robot. The EA draws on the chart: support/resistance (S/R) lines from the daily plan, the weekly plan and self-calculated S/R, liquidity zones, and for each setup you turn on: the entry zone, SL and TP. The EA shows whether a setup is pending, running (profit/loss) or has hit TP/SL. The EA does not open trades by itself, does not manage trades after they fill and does not read your account password. It only sends the Alpha server your MT5 account number, the machine ID (Device ID) and the symbol name, to check the license and fetch the plan. Plans are written by the admin and the EA only displays them. You can combine this content with the free indicators and trading signals provided by AlphaOnChart. Plans are synced daily from the server.
- 02
What you get after installing the EA
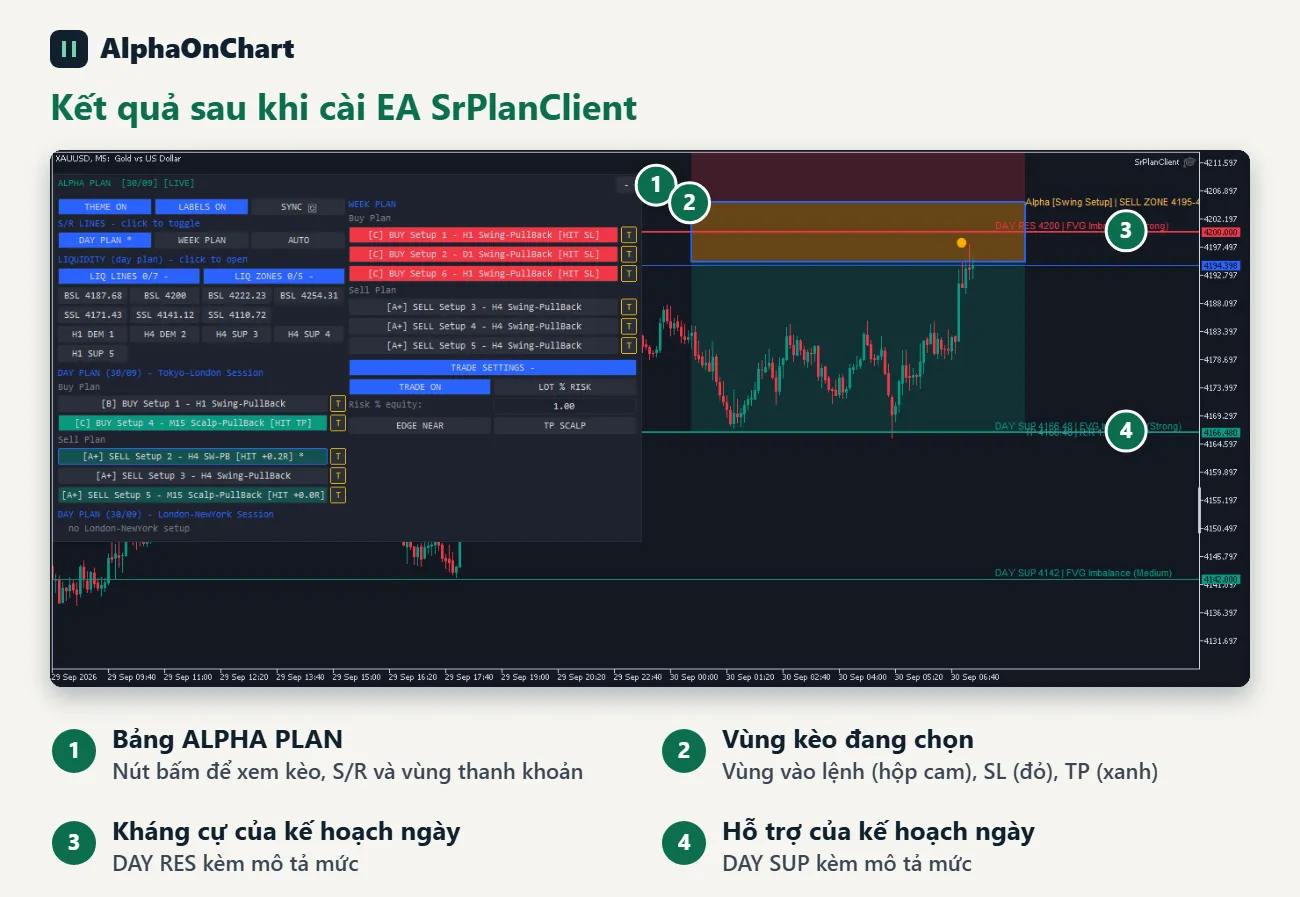
This is the interface you will have when you finish: the ALPHA PLAN panel in the top-left corner, the support and resistance levels of the daily plan, and the entry zone, SL and TP of the selected setup. Use the buttons on the panel to view each buy or sell setup. Pullback setups are marked “PB” and Breakout setups “BO”. Click the setups one by one to show the matching content on the chart.
- 03
Preparation
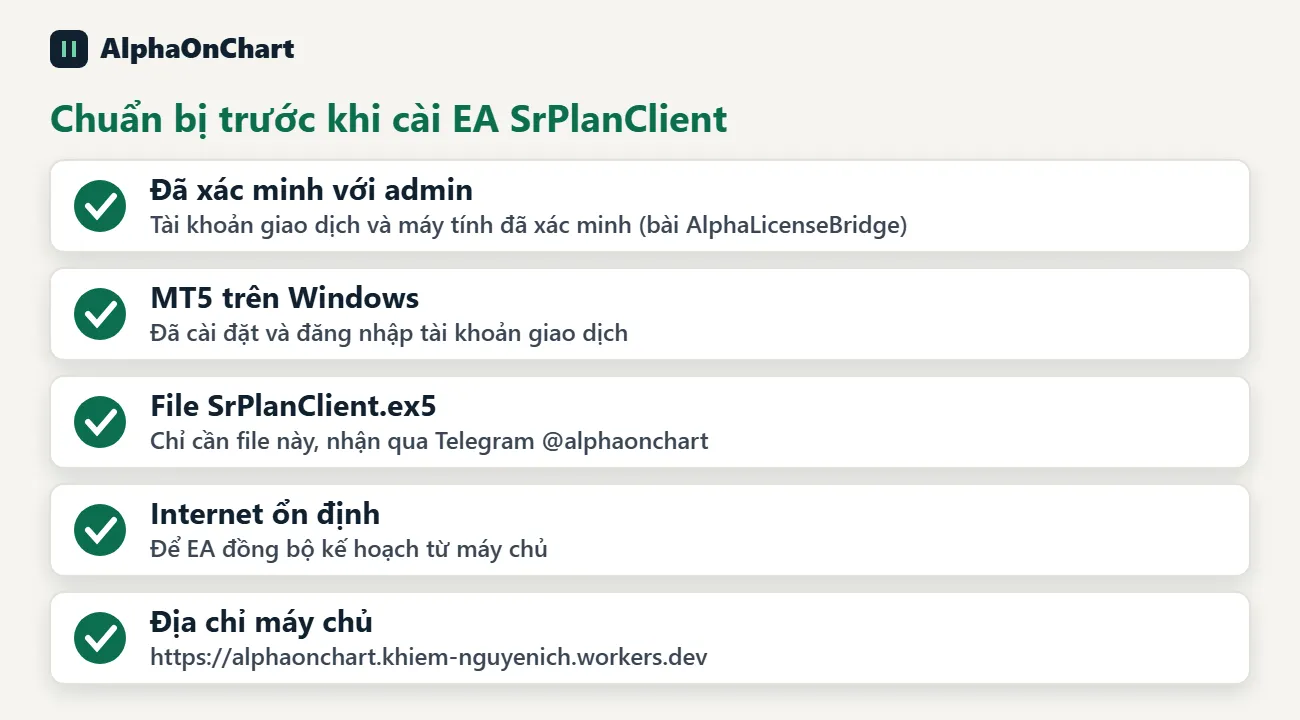
Important: before installing, you must successfully verify your trading account and computer with the Admin @AlphaOnChart (see the guide “Verify your MT5 account with the AlphaLicenseBridge EA”). • MT5 installed and signed in to your trading account (Windows) • The SrPlanClient.ex5 file (this is the only file you need) • A stable internet connection • A Telegram or MQL5 account for verification • Server address to declare in MT5: https://alphaonchart.khiem-nguyenich.workers.dev You only need to install once per machine. If you change device, change trading account or reinstall MT5, do it again.
 Message us on Telegram to get the SrPlanClient.ex5 file →
 - 04
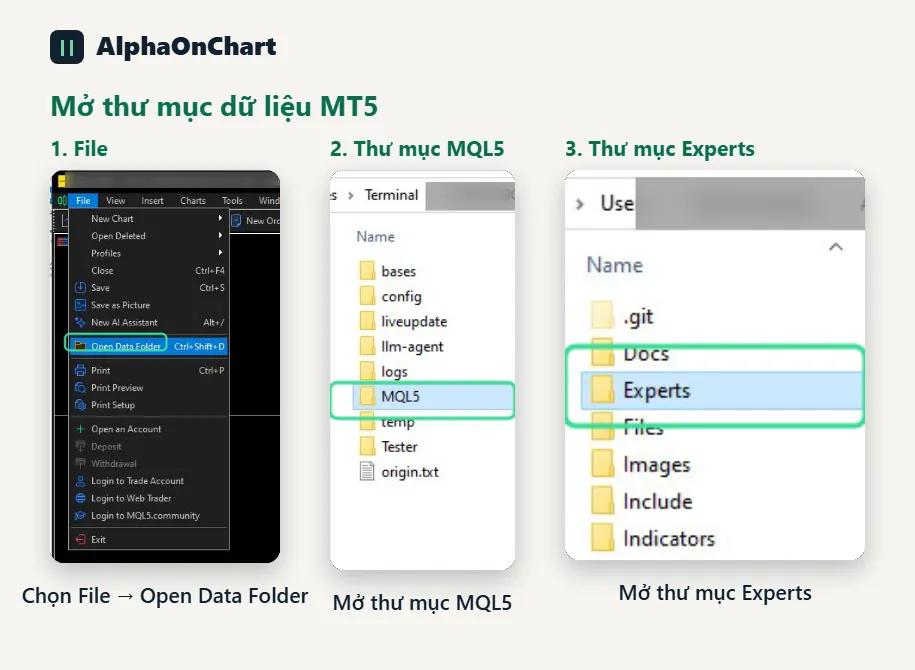
Installation step 1: open the MT5 data folder
In MT5, choose File → Open Data Folder to open the data folder. Then open the MQL5 → Experts folder.
- 05
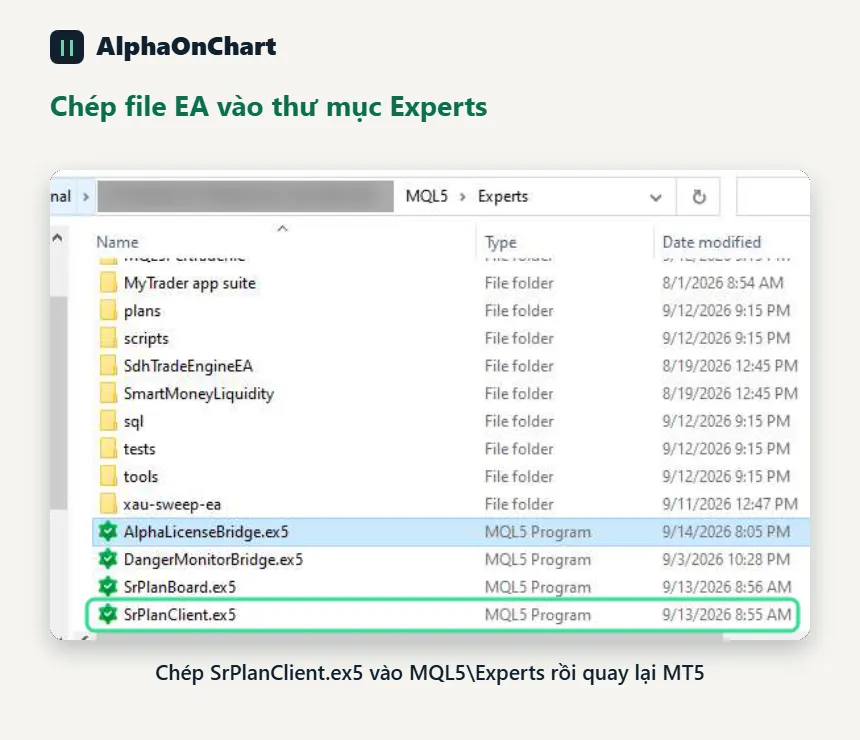
Installation step 2: copy the EA file
Copy the SrPlanClient.ex5 file into the MQL5\Experts folder. You only need the .ex5 file, no other files. When done, go back to MT5 to continue.
- 06
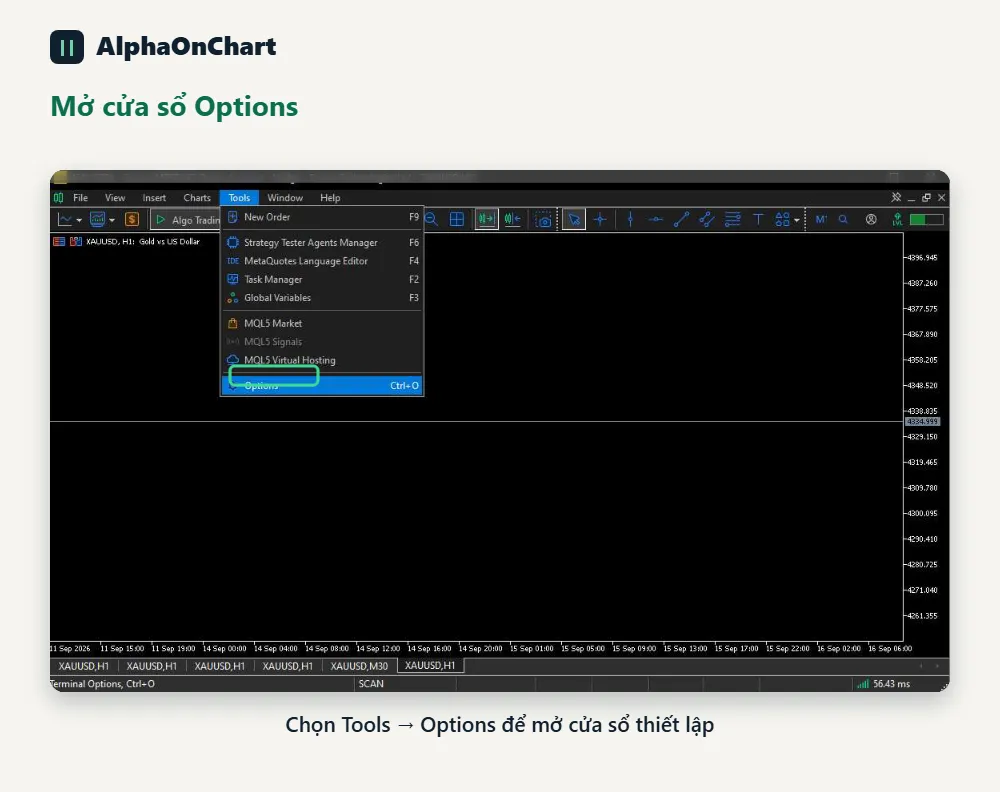
Installation step 3: open the Options window
In MT5, choose Tools → Options to open the settings window, at the spot marked in the screenshot.
- 07
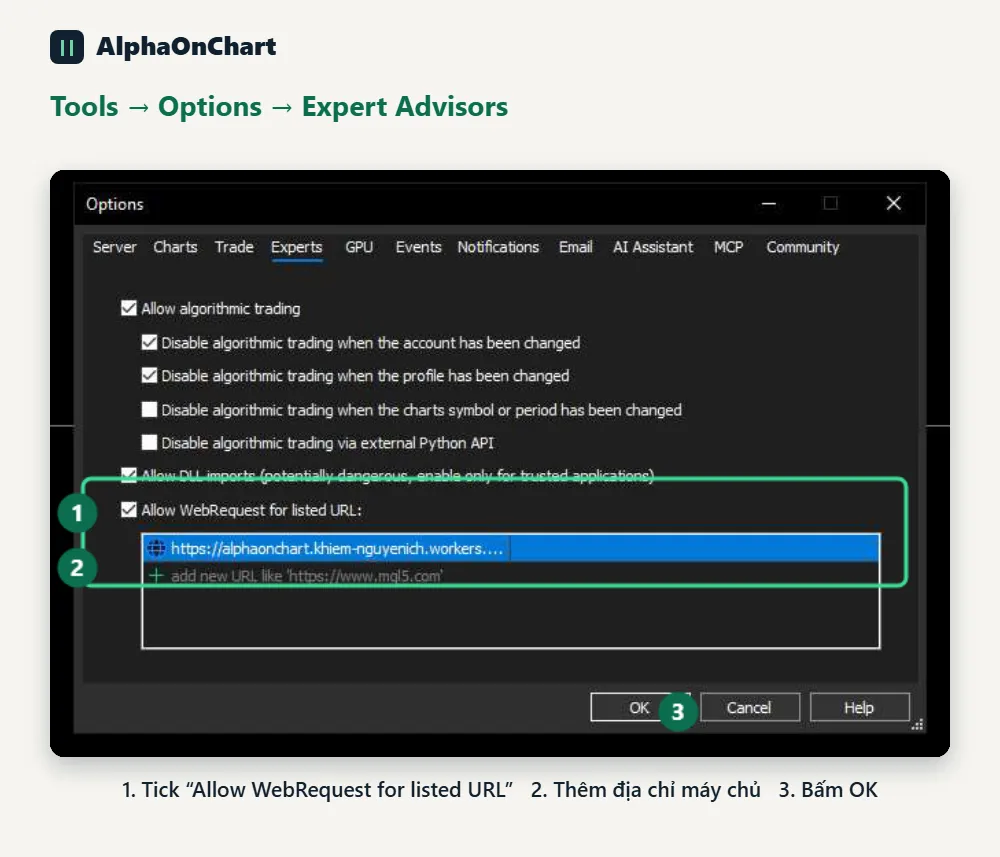
Installation step 4: allow WebRequest
Open the Expert Advisors tab and follow the numbers in the screenshot: 1. Tick “Allow WebRequest for listed URL” 2. Click the + sign and paste the server address, with no extra spaces and no trailing /: https://alphaonchart.khiem-nguyenich.workers.dev 3. Click OK Skipping this step is the most common mistake.
- 08
Installation step 5: attach the EA to the chart
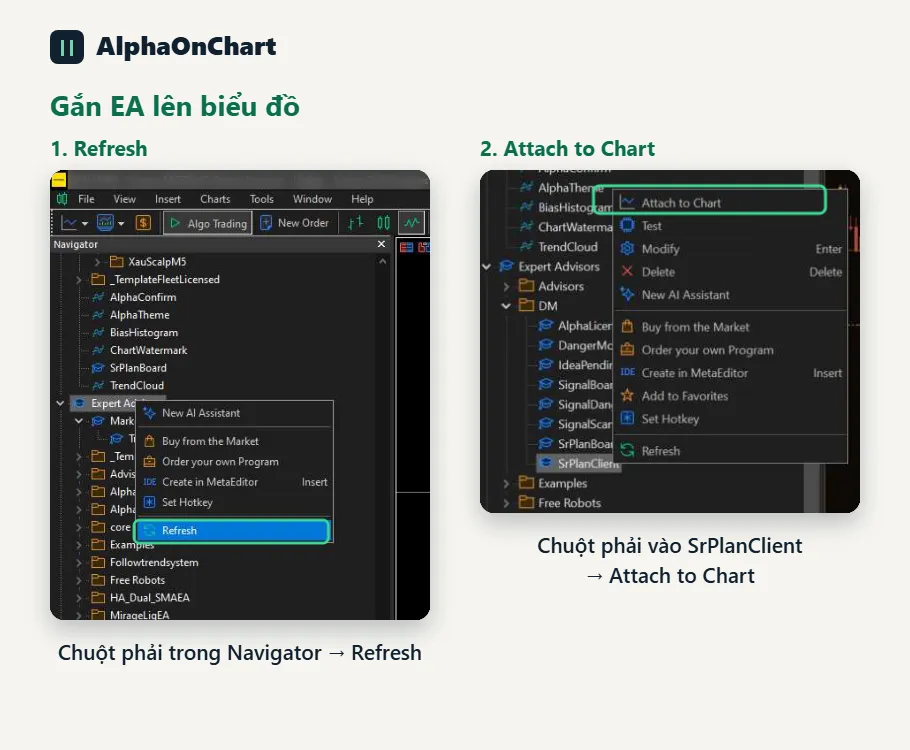
In Navigator → Expert Advisors, right-click and choose Refresh. When you see SrPlanClient, right-click and choose Attach to Chart (or drag it onto the chart of the symbol you want to watch, for example XAUUSD). One EA per chart. To watch another symbol, open a new chart and attach the EA to it.
- 09
Installation step 6: EA properties
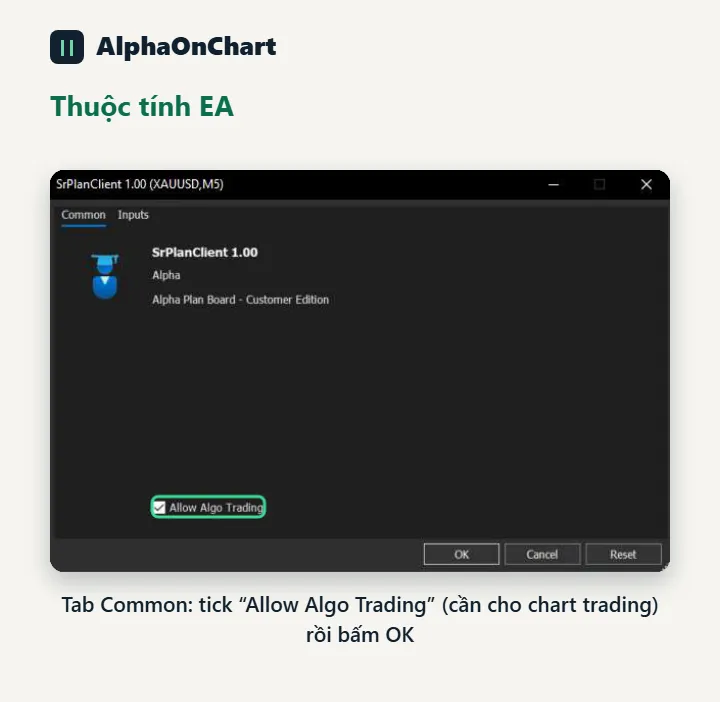
In the properties window, on the Common tab tick “Allow Algo Trading” (needed for chart trading, not required if you only view plans). Leave the Inputs tab at its defaults the first time, then click OK. If you plan to use chart trading, turn on the Algo Trading button on the MT5 toolbar.
- 10
Installation step 7: check that the EA attached successfully
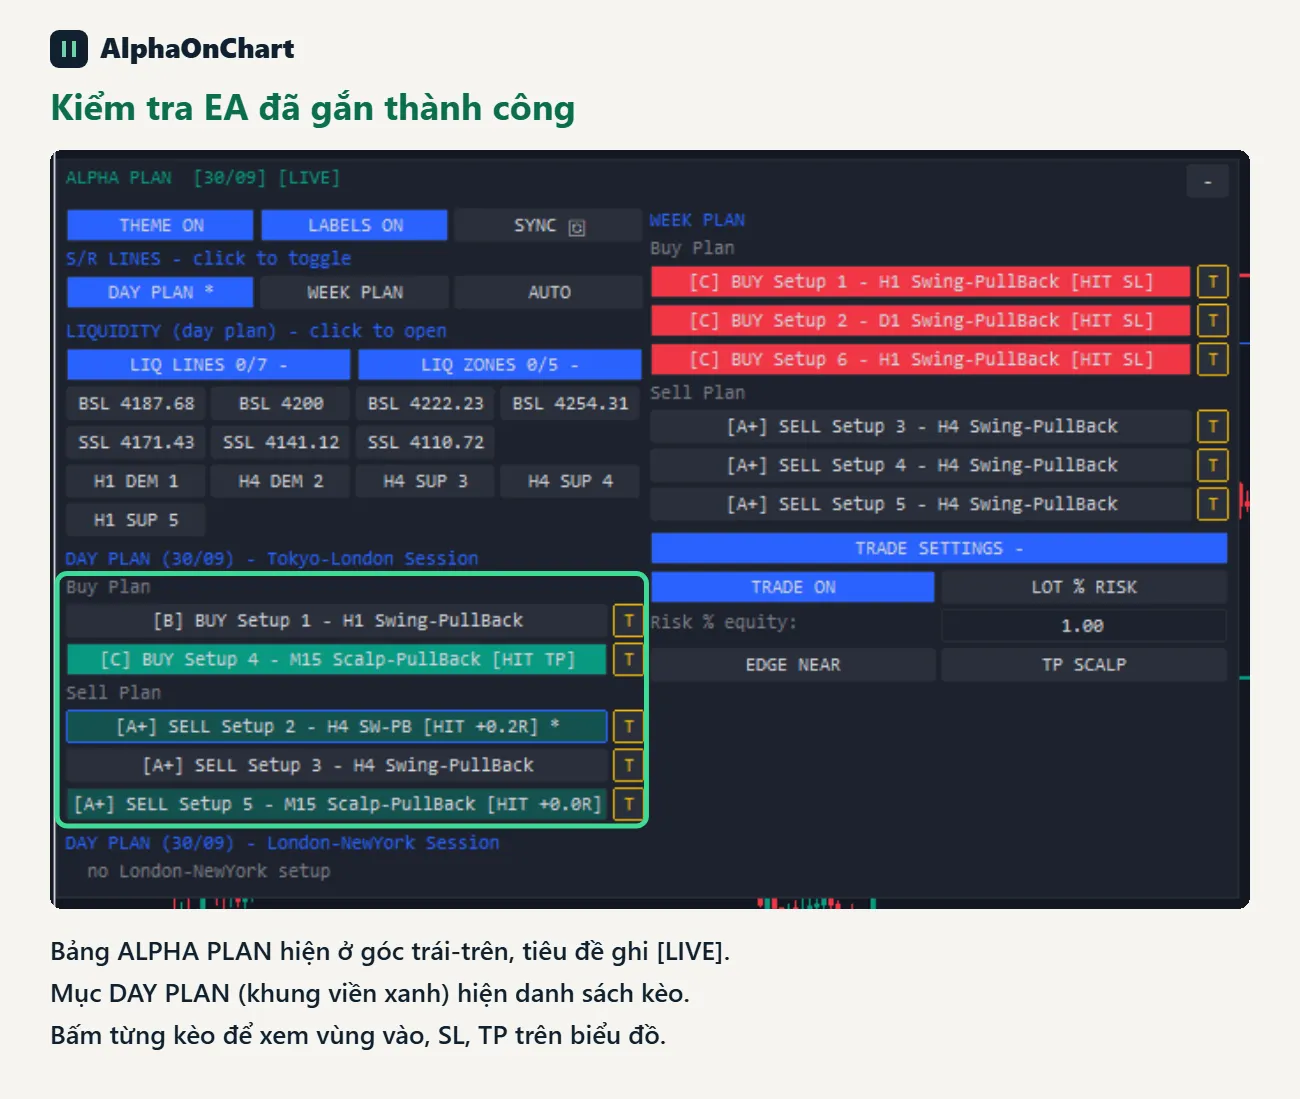
After a few seconds the ALPHA PLAN panel appears in the top-left corner. In the DAY PLAN section, the list of setups should appear. Click each setup to see its entry zone, SL and TP on the chart. At this point the installation is complete. If a yellow “ACTIVATION REQUIRED” card appears, continue with the activation step below.
- 11
First-time activation
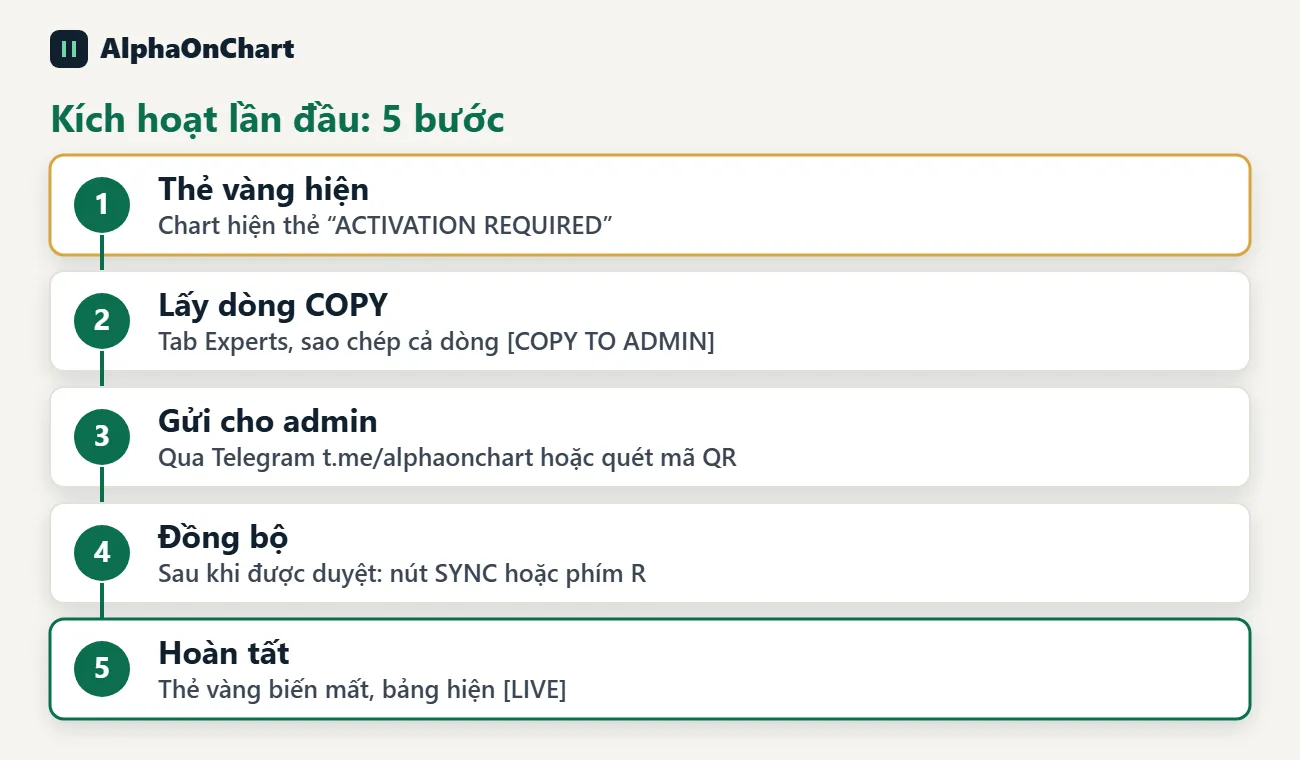
Your MT5 account and machine must be approved by the admin. The first time you attach it, the EA shows a yellow “ACTIVATION REQUIRED” card in the middle of the chart and prints a line starting with [COPY TO ADMIN]: in the Experts tab. 1. Open the Experts tab (View → Toolbox or Ctrl+T) 2. Copy the whole line verbatim, without editing or trimming it 3. Send it to the admin via Telegram https://t.me/alphaonchart (or scan the QR code on the card) 4. When the admin confirms approval, click the SYNC button on the panel, press the R key on the chart, or remove and re-attach the EA 5. It worked when the yellow card disappears and the panel shows ALPHA PLAN … [LIVE] Do this once per machine. If you change machine, change account or reinstall MT5, do it again and tell the admin.
 Send the COPY line via Telegram →
 - 12
Reading the ALPHA PLAN control panel
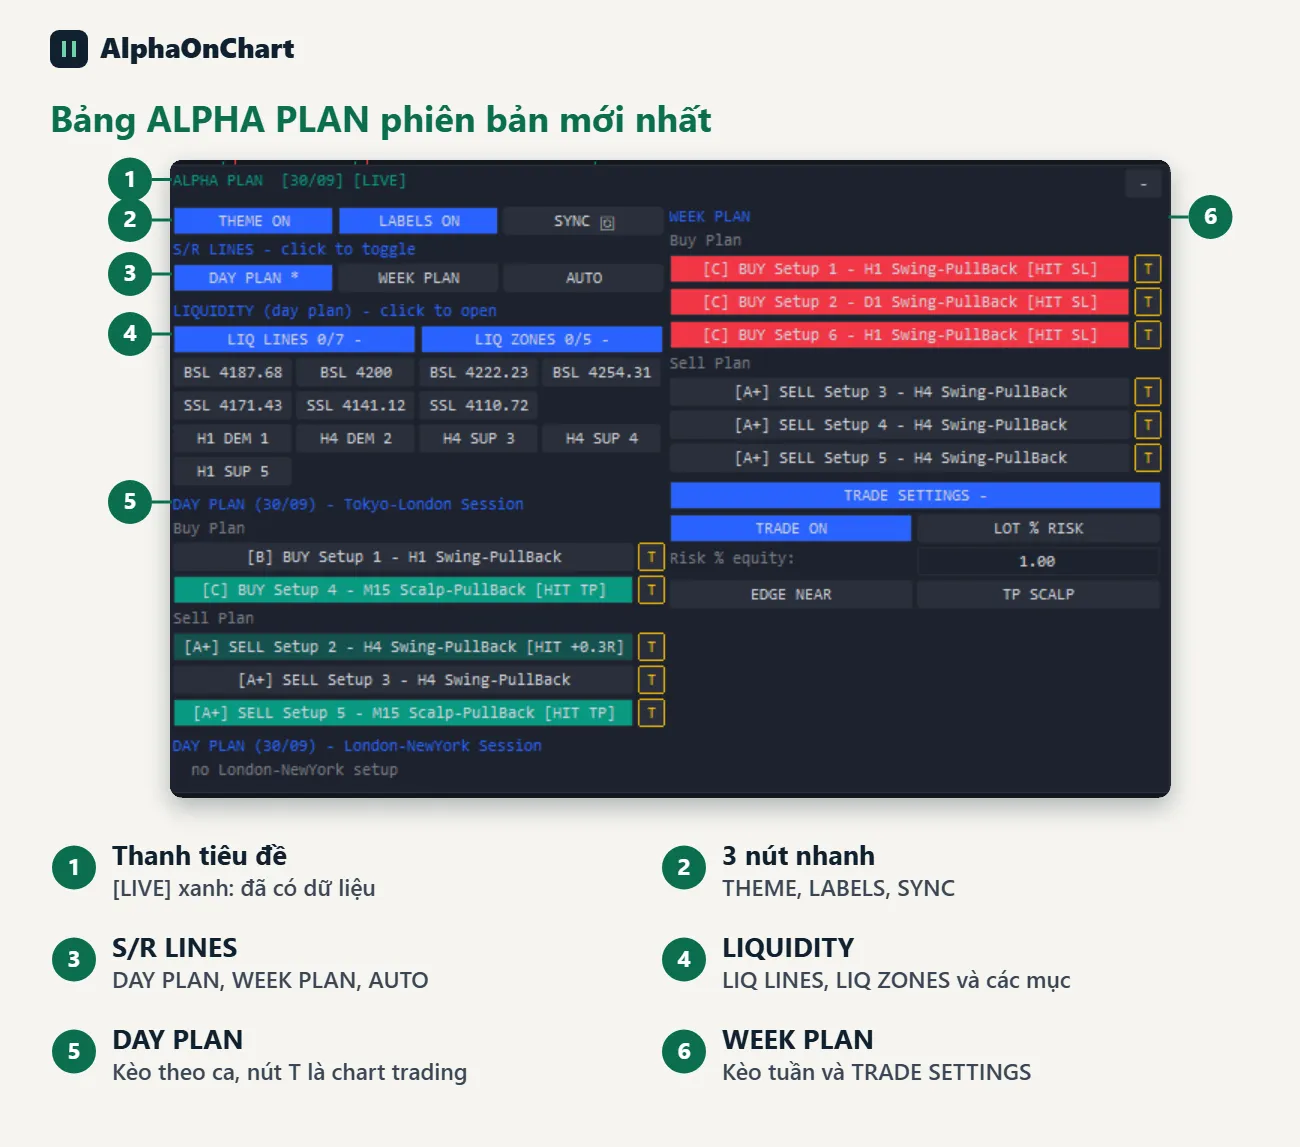
Title bar: ALPHA PLAN [dd/mm] [LIVE]. [LIVE] (green) means data was retrieved; [CONNECTING] (red) means it was not. The - / + buttons collapse or expand the panel. Drag the panel by its title bar; the position is remembered per symbol. Three quick buttons: • THEME ON/OFF: turns Alpha's dark theme on or off • LABELS ON/OFF: turns price labels on or off • SYNC: reloads the plan immediately (same as the R key) S/R LINES (an * means on): • DAY PLAN: daily-plan S/R (solid line) • WEEK PLAN: weekly-plan S/R (dash-dot line) • AUTO: self-calculated S/R for the open timeframe, off by default
- 13
Liquidity zones
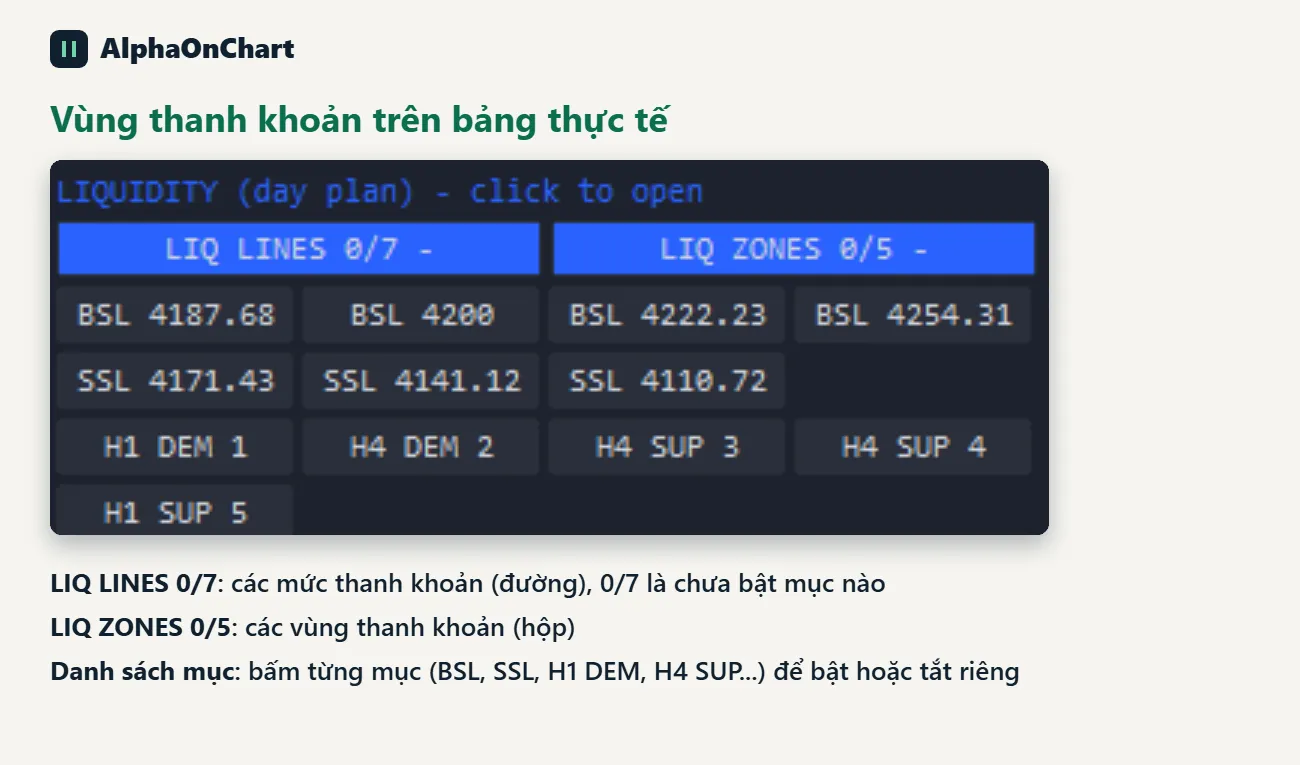
The LIQUIDITY (day plan) section has two drop-down buttons showing the number of items on out of the total, for example LIQ LINES 2/5: • LIQ LINES: liquidity levels (lines) • LIQ ZONES: liquidity zones (boxes) Click a button to expand the list, then click each item to switch it on or off individually. All items are off by default because turning them all on would cover the candles.
- 14
Reading and switching on setups
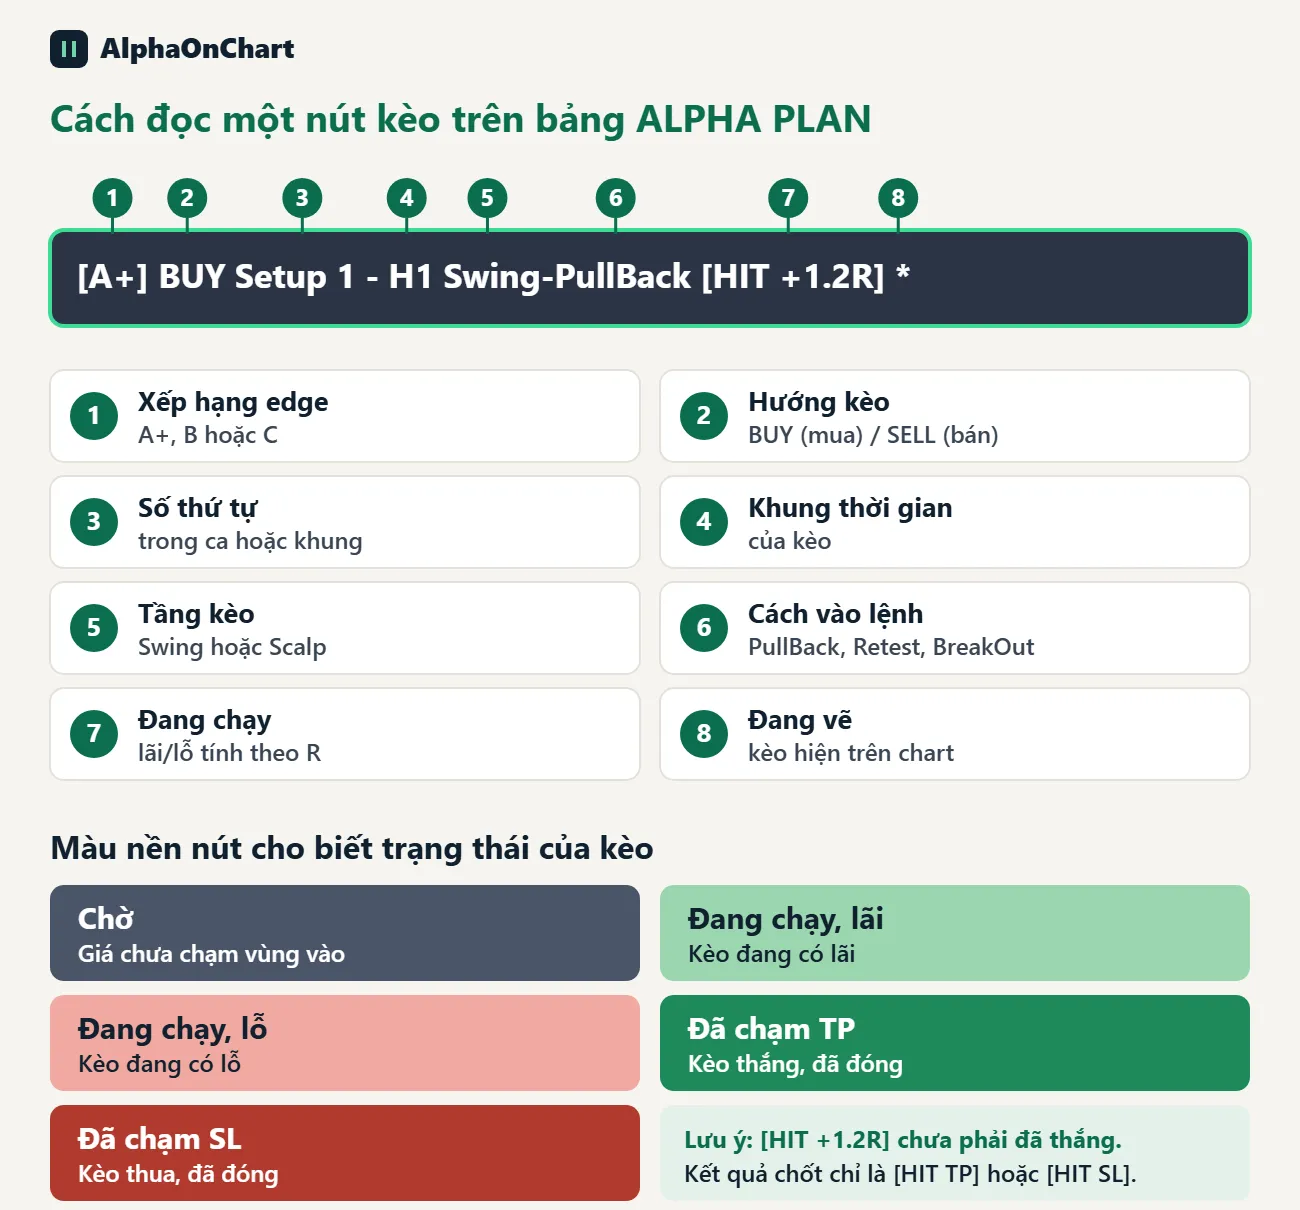
The panel has three sections: DAY PLAN – Tokyo-London Session (morning shift), DAY PLAN – London-NewYork Session (evening shift) and WEEK PLAN, each split into a Buy Plan and a Sell Plan. A setup button looks like [A+] BUY Setup 1 - H1 Swing-PullBack [HIT +1.2R] *. Pullback setups are marked PB and Breakout setups BO. Hover over a button to see its tooltip. Click a setup button: 1. Setup is off: shows the setup on the chart (entry zone, SL, TP). After about 1 second the EA adjusts the chart scale to fit the candles and the setup 2. Setup is on but the chart is on a different timeframe from the setup: click again to switch the chart to the setup's timeframe 3. Setup is on and the chart is on the right timeframe: click to turn it off Switching setups on and off is not remembered long-term; if you remove and re-attach the EA, click the setup you want to view again.
- 15
Examples of setups on a real panel
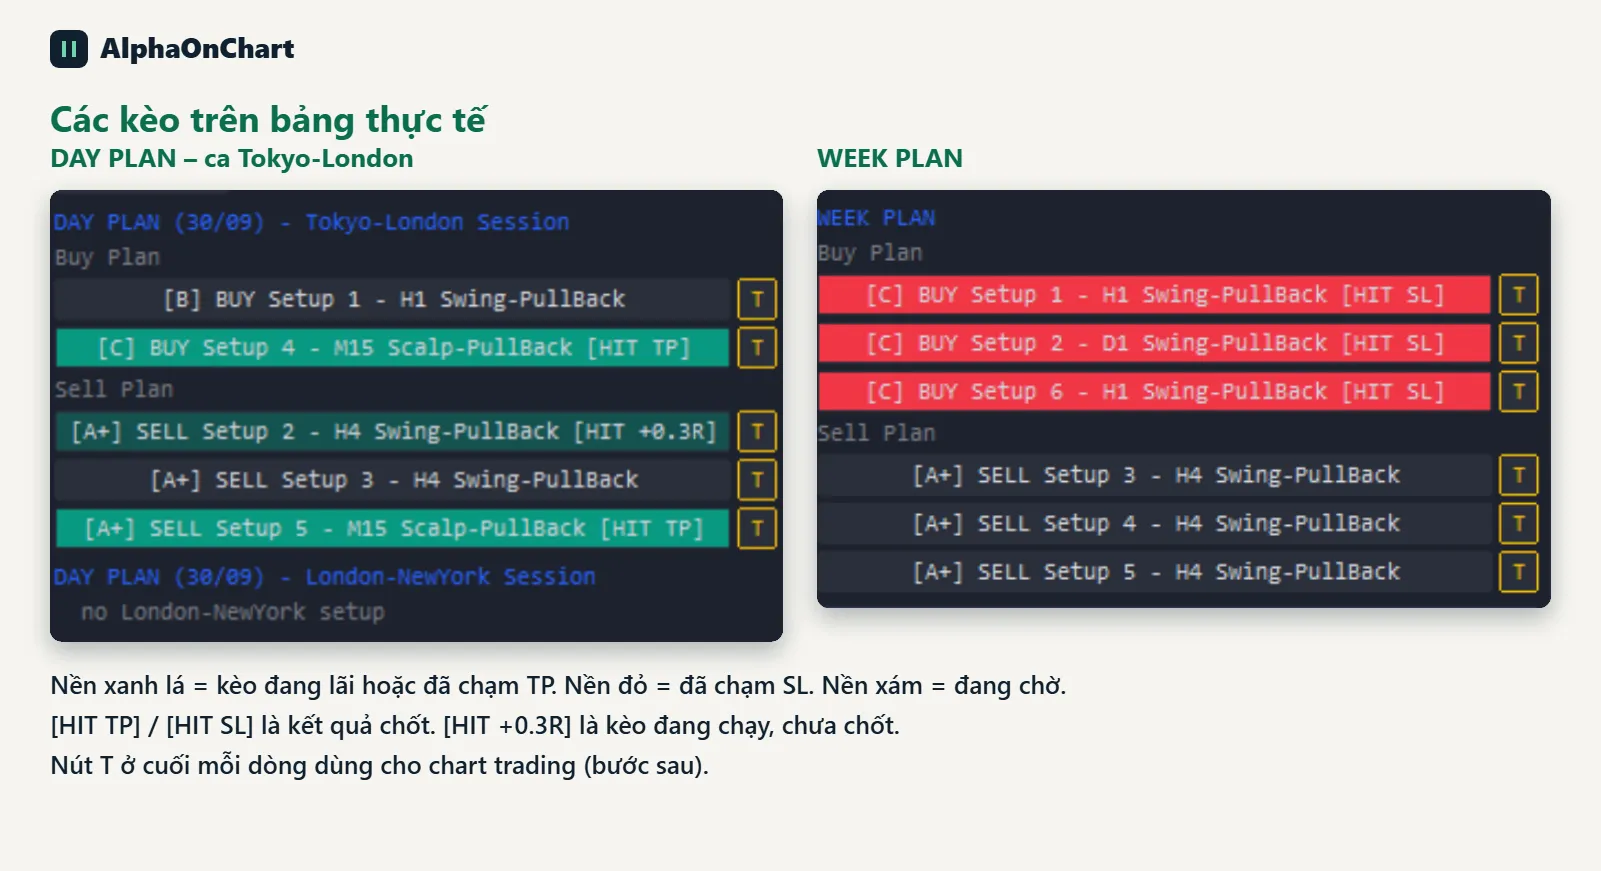
A screenshot of the panel in the latest version. The left column is the DAY PLAN for the Tokyo-London session (split into Buy Plan and Sell Plan) and the right column is the WEEK PLAN. A green background means the setup is in profit or has hit TP, red means it has hit SL, and grey means it is pending. The T button to the right of each setup is only used when chart trading is on.
- 16
How setups are marked pending, running and closed
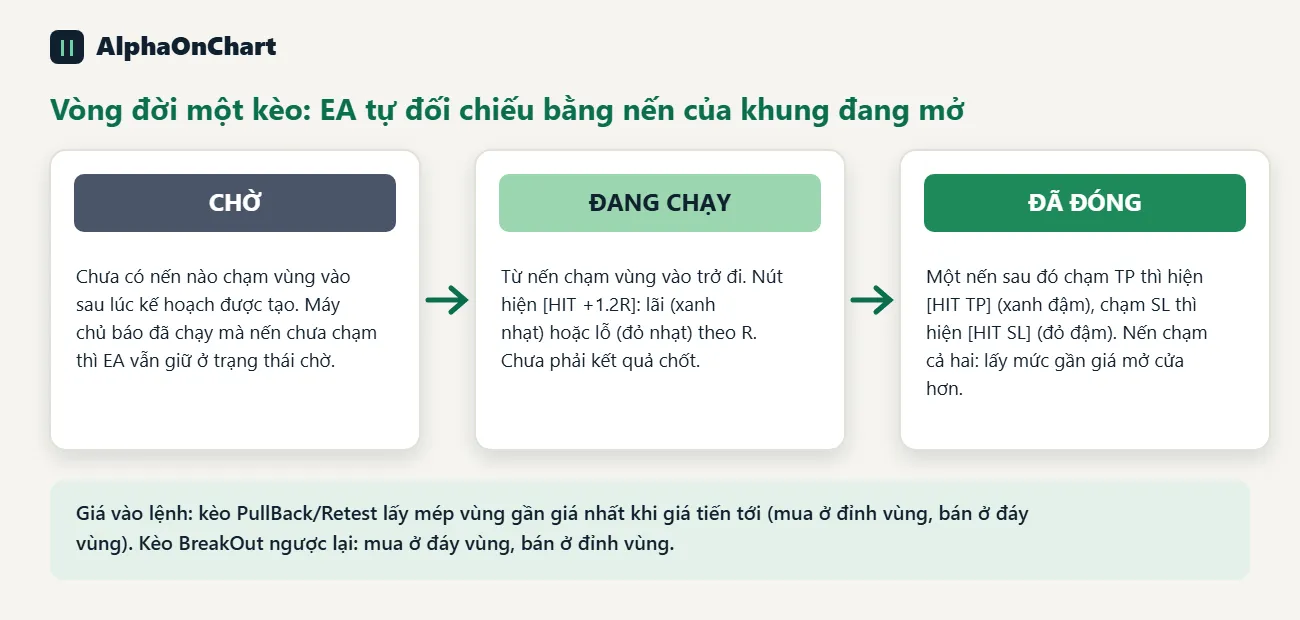
The EA checks the status against the candles of the open timeframe: • A setup stays pending until a candle touches the entry zone after the plan was created • From the candle that touches the zone onward, the setup is running. If a later candle hits SL or TP, the setup closes • For PullBack/Retest setups the entry price is the zone edge nearest to price as it approaches (buy at the top of the zone, sell at the bottom). BreakOut setups are the opposite Two different timeframes can give slightly different results for setups where price only just brushed the zone.
- 17
The TRADE SETTINGS block on the panel
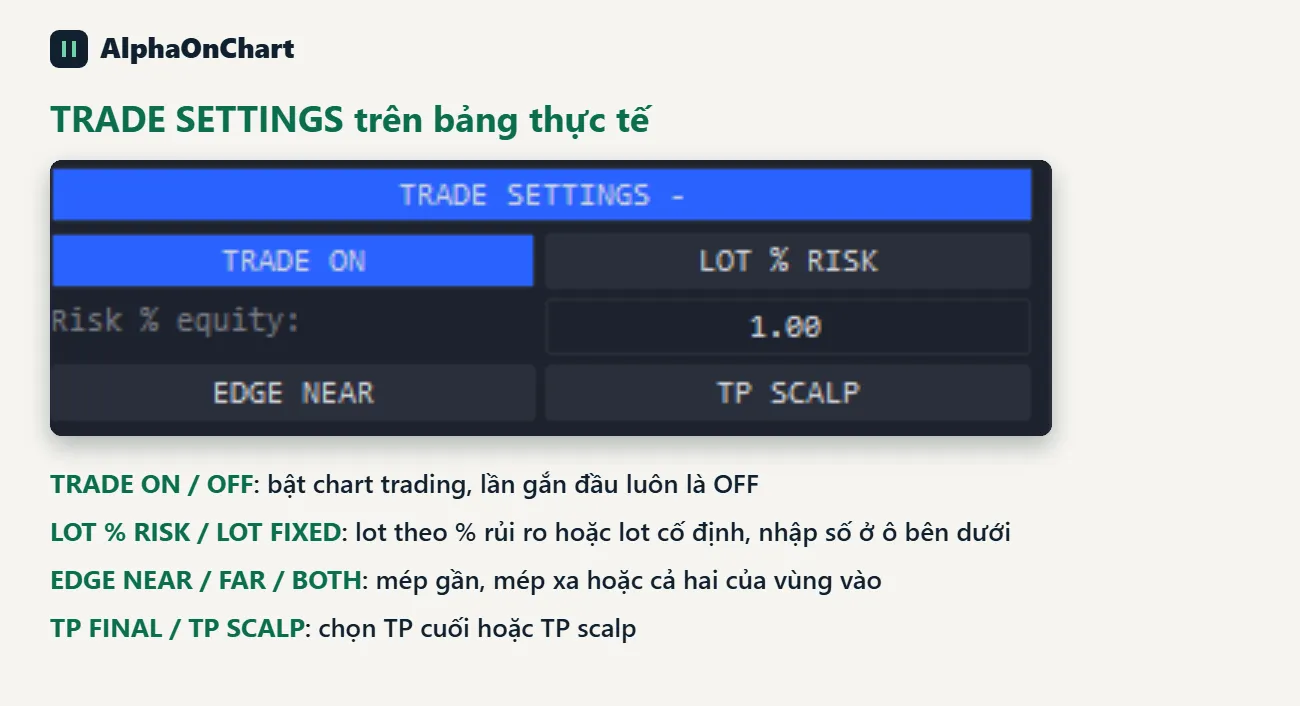
Click TRADE SETTINGS + to open the settings block. The buttons are: TRADE ON/OFF, LOT % RISK or LOT FIXED (enter the number in the box below), EDGE NEAR/FAR/BOTH, TP FINAL or TP SCALP. The first time you attach the EA it is always at TRADE OFF.
- 18
Chart trading (optional, off by default)
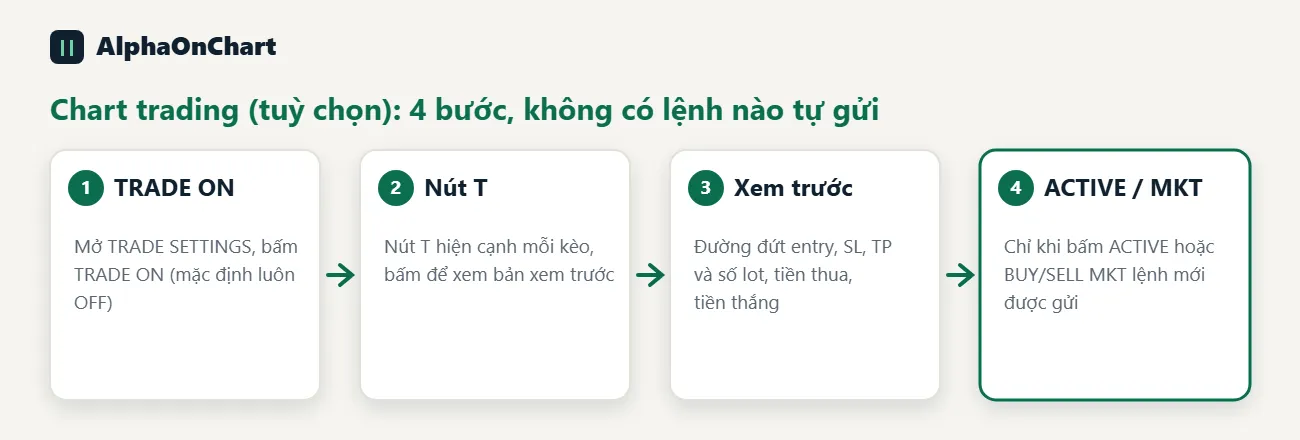
Click TRADE SETTINGS + then TRADE ON. The first time you attach the EA it is always at TRADE OFF. A T button appears next to each setup; clicking T only draws a preview. An order is only sent when you click ACTIVE (pending order) or BUY MKT / SELL MKT (market). X cancels the preview. Settings: LOT % RISK or LOT FIXED; EDGE NEAR, FAR or BOTH; TP FINAL or TP SCALP. Good to know: • SL is always the plan's SL. Lots based on % risk are rounded down to the lot step, and if below the broker's minimum they are raised to the minimum • One order per setup and per edge • MT5's AutoTrading and the EA's Allow Algo Trading must both be on, otherwise it reports BLOCKED • Some messages appear in Vietnamese without diacritics; that is the correct text • The EA does not manage trades after they fill: you trail, move to break-even and cancel orders when the plan expires yourself
- 19
Plan updates and keeping your license
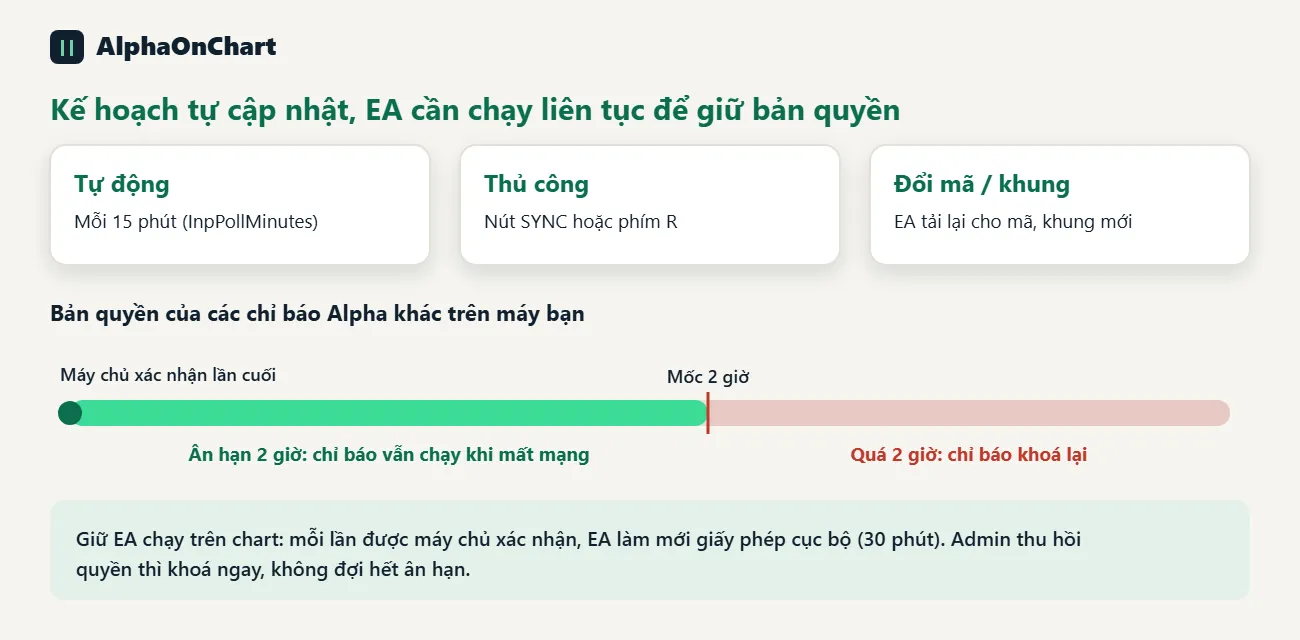
The plan updates itself every 15 minutes (the InpPollMinutes parameter), or click SYNC / press the R key. If you change symbol or timeframe, the EA reloads for the new symbol/timeframe. A brief network loss does not remove the setups already shown. Keep the EA running on the chart: each time the server confirms, the EA refreshes the local license (30 minutes) for the other Alpha indicators. If the network drops, indicators get a 2-hour grace period; if you turn the EA off or it cannot be confirmed for over 2 hours, the indicators lock. If the admin revokes access, they lock immediately. The computer limit is set by the admin; a machine over the limit waits for the admin to handle it.
- 20
Troubleshooting
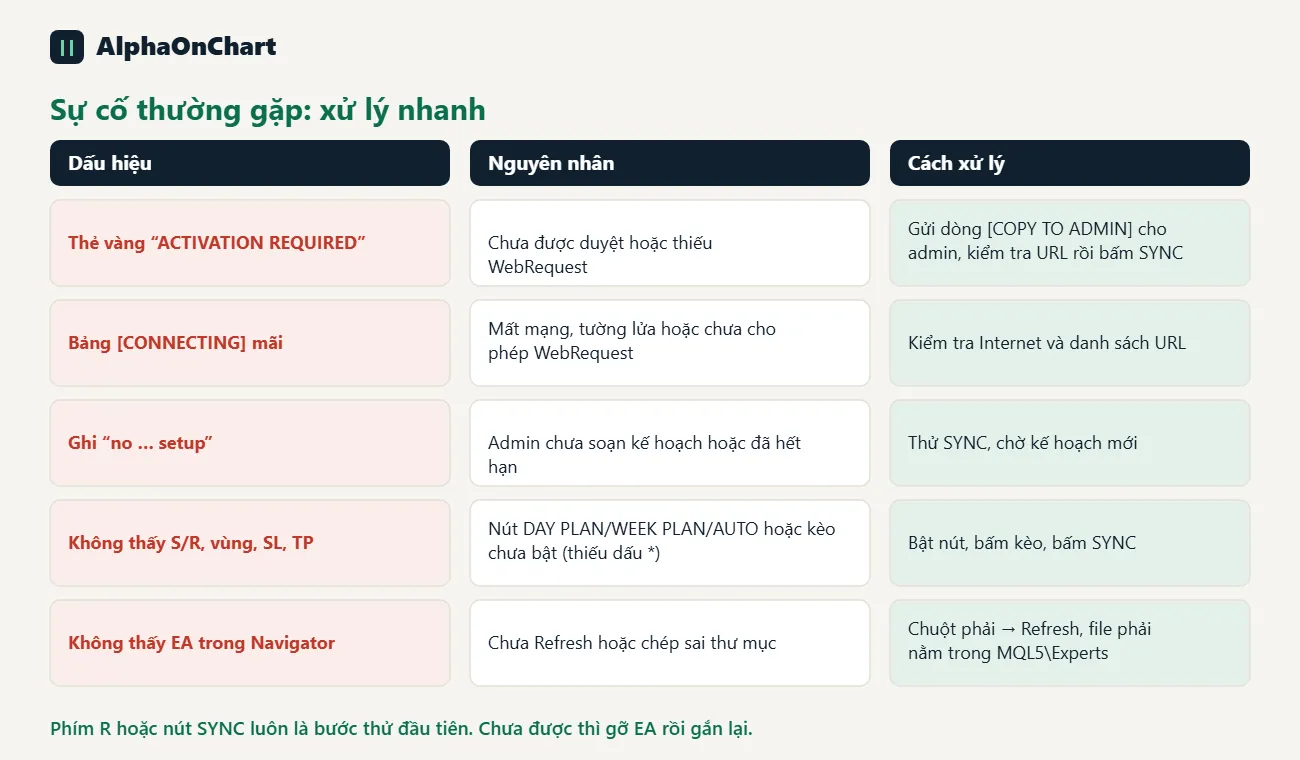
• Yellow card shows up on the very first attach: not approved yet, do step 4 • Yellow card with the error WebRequest not allowed (4014): redo the WebRequest step from step 3, then click SYNC • Approved but the yellow card is still there: click SYNC or press R; if that fails, remove the EA and attach it again • Panel stuck on [CONNECTING]: check your internet, firewall and the URL list • Panel not showing: turn on InpShowPanel, or remove the EA completely and attach it again to return to the default position • All three sections say “no … setup”: the admin has not written a plan or the plan has expired, try SYNC • No S/R visible: turn on DAY PLAN / WEEK PLAN / AUTO, click SYNC • No zone, SL or TP for a setup: the setup is not on (the * is missing) • No liquidity zones visible: they are off by default, expand the list and click each item • Chart jumps to another timeframe when you click a setup: by design, click again to turn it off • No T button: you are at TRADE OFF • EA not visible in the Navigator: Refresh, and check the file is in MQL5\Experts
- 21
Things that look like bugs but are not
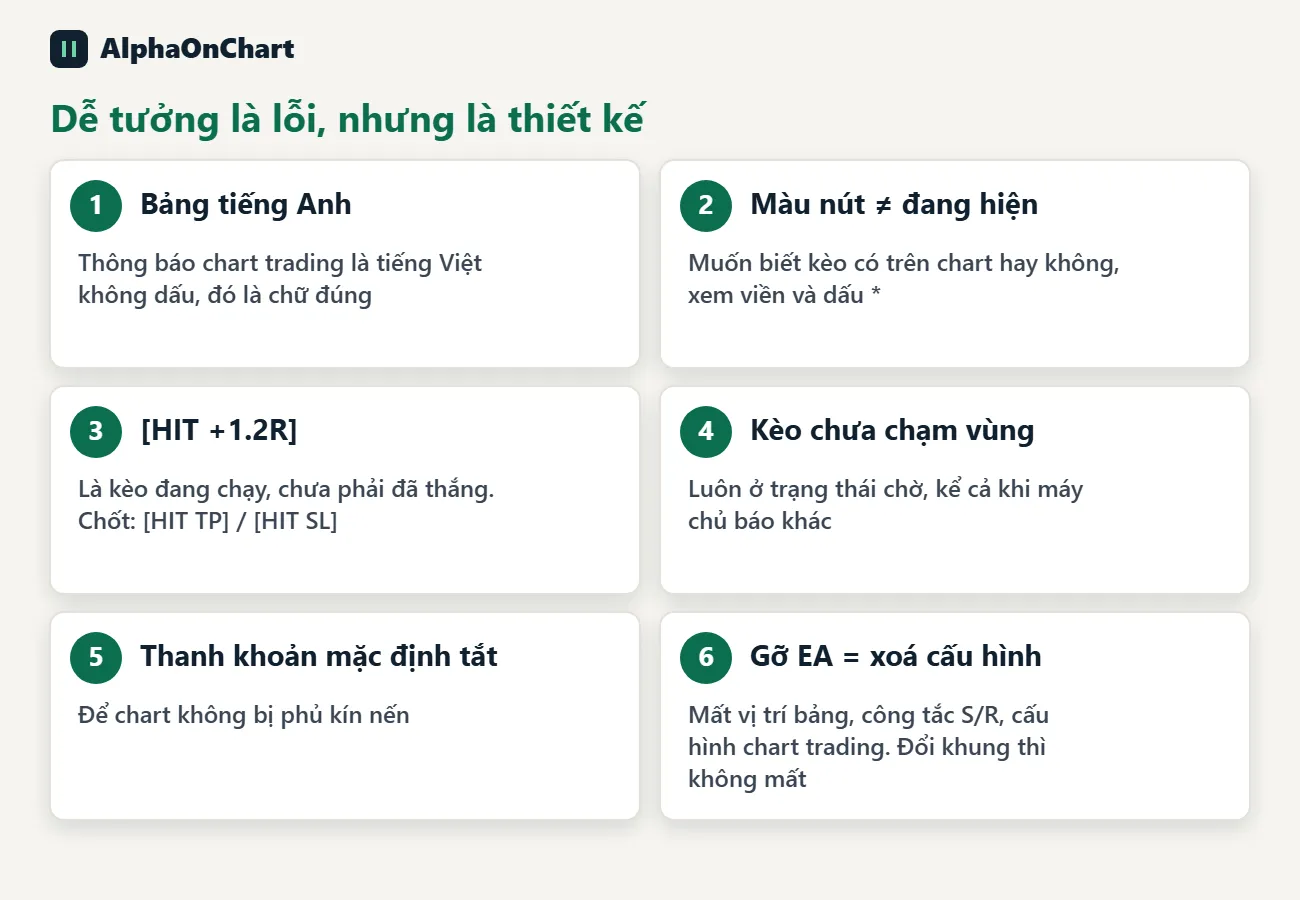
• The panel is in English, and chart-trading messages are in Vietnamese without diacritics • A button's background colour only shows the setup's status; whether it is shown on the chart is indicated by the border and the * • [HIT +1.2R] means the setup is running, not that it has won. Final results are only [HIT TP] / [HIT SL] • A setup that has not touched the zone is always pending, even if the server says otherwise • All liquidity items are off by default • Removing the EA from the chart also clears the remembered panel position, S/R switches and chart-trading configuration. Changing timeframe, recompiling or changing parameters does not clear them